Future planning in the bullet journal doesn’t have to be complicated. Here’s a closeup of my simple system (and a few others that are sure to keep you on top of your game!).
|The Easiest Future Planning Method You’ll Ever Use|
No more guessing about your schedule. Today, I’ll walk you through the most common future planning methods you’ll find in the bullet journal community. The best part: you’re never stuck with something that doesn’t work for you. If you don’t like it, turn the page and try something new.
Why All the Hype About Future Planning?
You can’t have a conversation about bullet journaling without landing on future planning. It’s on everyone’s minds…
“Future planning in a bullet journal is too complicated,”
“I need to see what’s coming up two months from now. Not just today!”
and my personal favorite,
“I can’t bullet journal because I need a calendar.”
If you’re new to bullet journaling >>START HERE<<.
Every one of these concerns has an easy solution. In the beginning, it was tough for me to wrap my mind around not having a pre-printed schedule. I completely understand why it’s overwhelming, even intimidating. Future planning can throw people for a loop. And IT’S ESSENTIAL!
Having a mindful plan for your entire life (including your schedule) is what separates a bullet journal from an ordinary notebook.
You’re a planner, not a mindless to-do…er (Hmm. To-doite? To-donian? To-do person? It’s settled: to-doer!). A good future planning system will:
- give you a long lead time
- truly enable a single notebook system
- mark you as a professional because you’ll be on top of things
So, which method is the right fit for you?
The Column Method: My No-Nonsense Approach
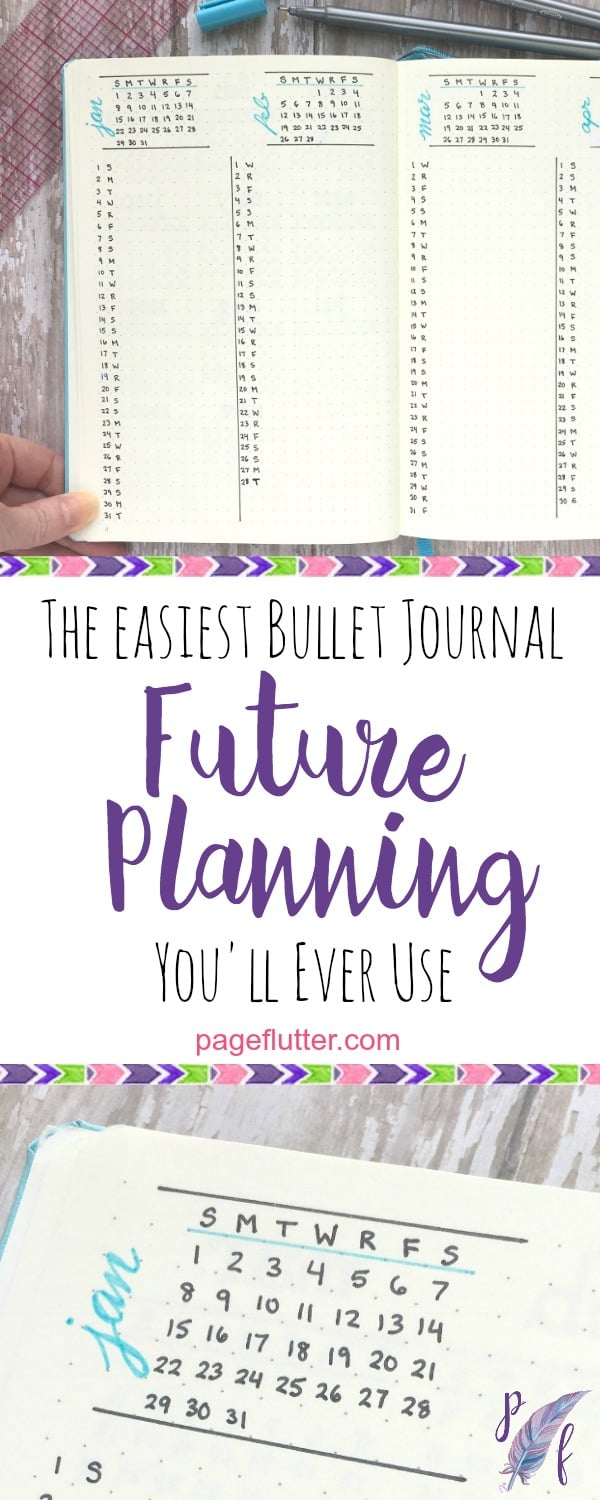
I can’t believe I haven’t posted about this before! I’ve shared pictures of my future planning on Instagram, but you deserve a peek before the scribbling begins. I started prepping a light blue Leuchtturm1917 for my 2017 journal over the last week or two, so it was a good time to show you a shiny new spread. I’ve used this method for over a year and it hasn’t failed me yet!
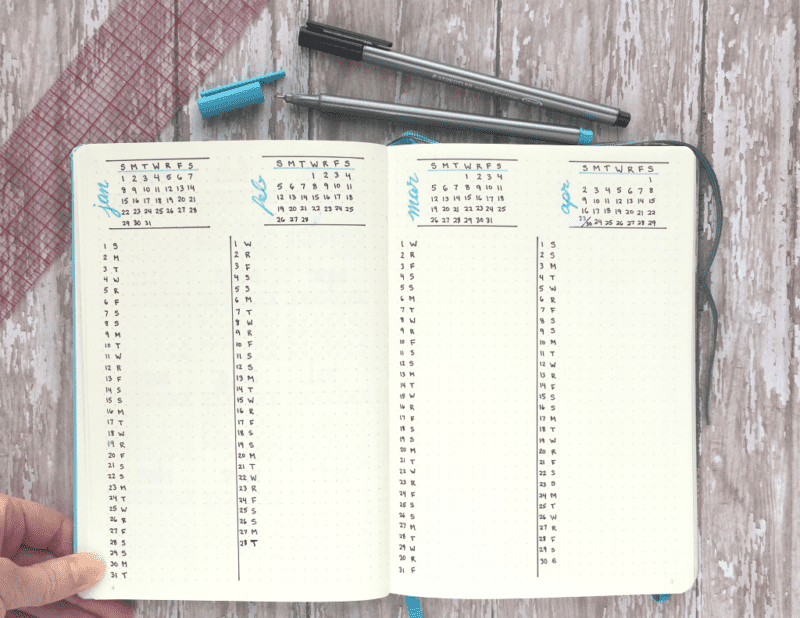
The column method is unbelievably simple to implement:
- Write the dates for each month in a column. I’ve also added days of the week.
- Repeat until you have 4 months on a 2-page spread. You can see what this looks like in the photo above
- Create 2 more spreads to cover the rest of the year (assuming you’re starting in January)
- I used a couple of my Steadtler fineliners for a touch of color
You now have a year’s worth of planning at the front of your journal. As the months wear on, you can create another 4-month spread anywhere in your journal if you need to plan into the next year. Just remember to “thread” the page to your existing future planning spread. It’s a fast spread to make, though.
Now, how do we get from here to a monthly spread?
Migration!
As I move closer to an appointment, I migrate (–>) to more immediate spreads, essentially zooming in for a more detailed look.
- Future Planning (general long-term planning, few details) –> Monthly spread (specific date & time/short-term planning) –> Weekly or daily spreads (very detailed, including notes for the meeting, important names, directions, etc.)
When I set up my monthly spreads I:
- Check the holiday/birthday tracker
- Migrate appointments from my future log to the monthly spread.
- Migrate last month’s unaccomplished tasks/goals if they’re still worth my time. Ditch tasks that no longer makes sense.
Great for people who: need a designated place for any appointment that could arise/ don’t mind migration / like having a year’s worth of planning at once / need a system with no learning curve.
Alternative Planning Methods
The column method works seamlessly for me, but that doesn’t make it a perfect fit for everyone. Here are a few more options to toss in your idea bag.
Ryder’s Simple 6-Pack
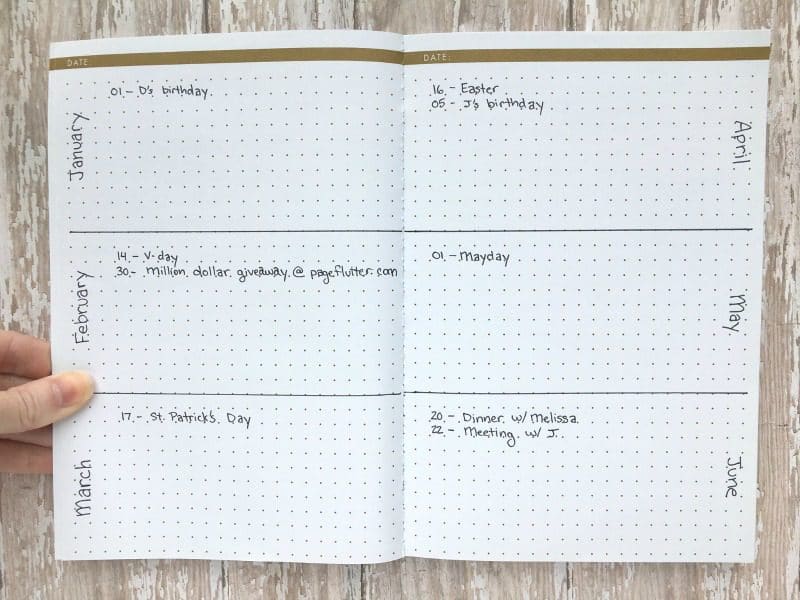
Ryder Carroll (Official Bullet Journal Website), the innovator behind the bullet journal system is a man who understands simple. And this spread is as simple as it gets. Draw two lines, and you end up with space for 6 months worth of appointment.
That being said, because it’s so simple, you may need other tools from time to time. If you need to know the 4th falls on a Wednesday, for instance, you can glace at your phone’s calendar or create a “Year-at-a-glance” spread.
Great for people who: Want to spend very little time drawing spreads. Have light to moderate monthly scheduling needs.
Stacked Monthlies
I’m going out on a limb with the option no one wants to talk about. Pre-writing. You can stack your monthlies at the front of your journal. It may not be conventional for bullet journaling (’cause we’re such conventional people, huh?), but it’s great if you don’t want to migrate from spread to spread.
Read my post of monthly spread options >>HERE<<.
Right after your index, draw spreads for all 12 months in advance. Now you can use your monthlies as a built-in future planning device.
The only downside to stacking your monthlies is you won’t have them as natural dividers as you work through your journal. Really, that’s not such a huge problem. Any other monthly page can create that demarcation (a habit tracker, monthly goals, projects, gratitude page, memories page, etc.). It’s really depends on what you use each month.
Great for people who: Have difficulty letting go of pre-printed planners/ who dislike migration.
Digital Methods
Using an analogue journal doesn’t mean you have to forsake the digital world. You can always use a digital calendar like Outlook, iCal, and dozens of calendar apps to wrangle your future plans. Each month you would migrate from your digital calendar to create your analog monthly spread.
You can also add digital planning to any other system I’m mentioning. My husband is a digital planner, so I put family appointments into a shared iCal to help him out.
We both know what’s going on, but my analogue brain doesn’t worry about losing things to digital black holes.
Great for people who: Need to share their schedule with a partner or spouse/ use digital reminder alarms/ need unlimited scheduling space / don’t suffer from “digital black hole” syndrome (I’m recovering, thanks).
Alastair Method
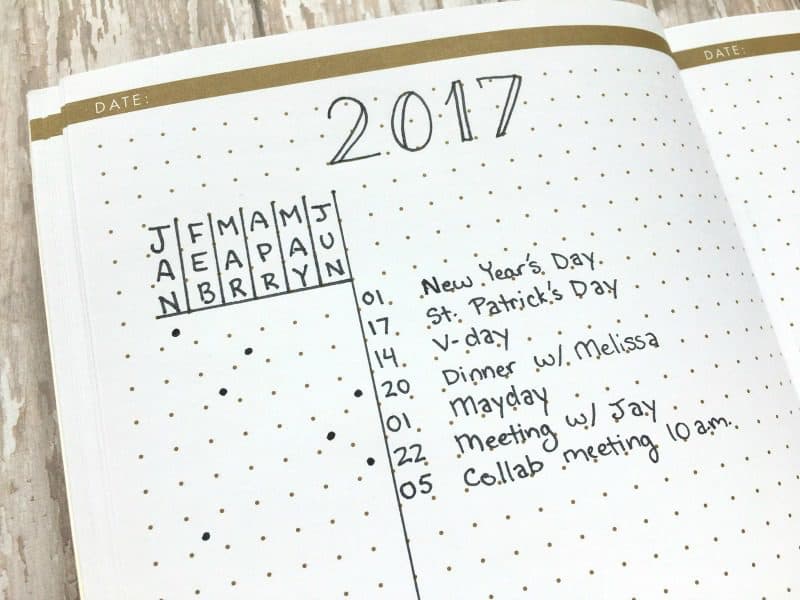
The Alastair method came to my attention when it appeared on the official bullet journal website over a year ago. It’s a very simple solution to keep track of your appointments by month.
Ryder’s setup uses a full 2-page spread for 6 months of planning. Alastair’s method fits on a single page. You can fit your entire year’s planning on a full spread. If you run out of room, just create another one later in your journal.
When it’s time to move to a new monthly spreads, run down that month’s column and migrate the bullets.
Great for people who: like something efficient and quick to set up/ don’t mind appointments being out of order.
The Calendex (a.k.a. Hope Method)
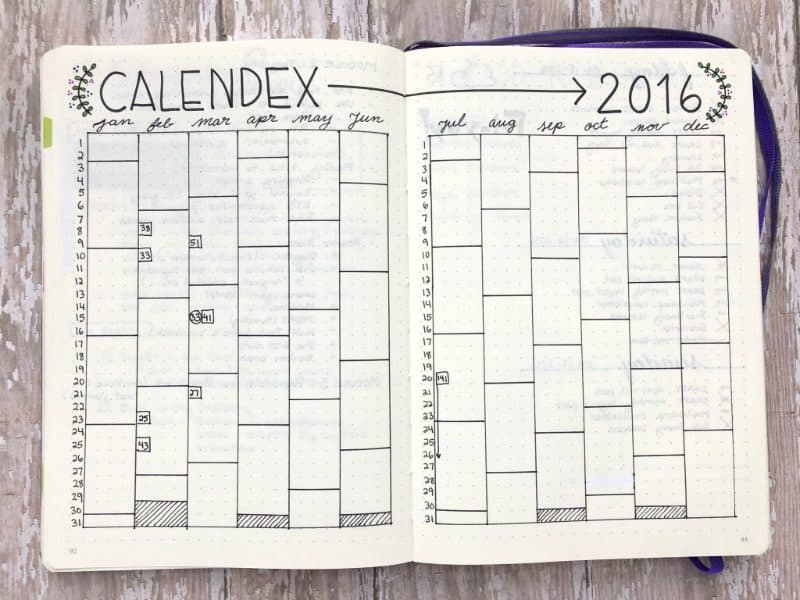
Look at that great picture of my beautiful Calendex spread from last year. I started it in February and abandoned it by March. There are very few appointments listed on it because I kept falling back on my regular future planning spread. Full disclosure, I’m terrible with a Calendex. So beautiful, and sooooo didn’t work for me.
I’m not ragging on the Calendex. Quite the opposite, in fact. Eddy Hope developed it as a solution for weaving appointment notes in with his dailies. There’s an elegance and genius to this system you won’t find with other methods.
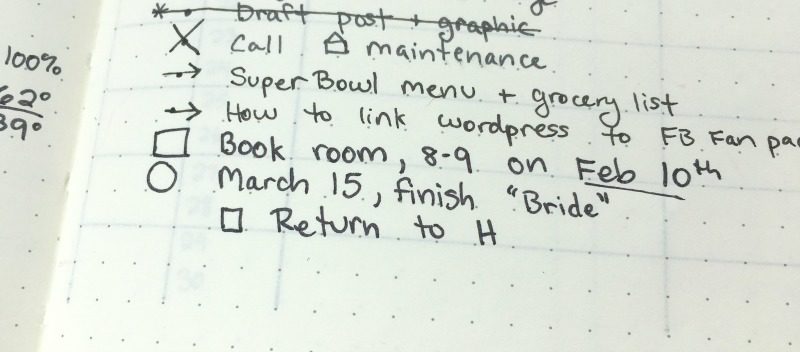
How it works: When you need to create an event, flip to your existing daily and create a check box for the event (see my example below). I had to work in the book room at my son’s school from 8-9 on February 10th (this daily appeared on page 33).
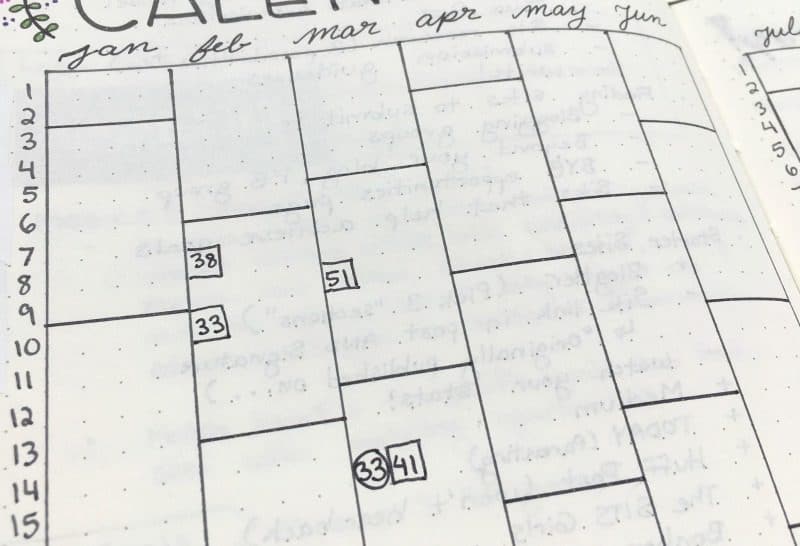
Then I flipped back to the Calendex spread and put the page number of the daily in the appropriate date box (Feb 10th). But what’s this? I had to make a second appointment, this time for March 15th. The plot thickens! This time, use a different shape for the check box. It helps keep them distinct from each other.
Now, look at the spread below and you’ll see February 10th and March 15th both have events. The details of both events are found on page 33. That’s a very basic explanation. You can read the full rundown on the official bullet journal blog.
Here’s what I love about the Calendex. It places the whole year on a tidy two page spread, breaks the months into weeks, and lets me see a busy day/week/month at a glance. Being able to take copious notes in dailies when scheduling an event is a huge plus. You can write down addresses, directions, special instructions, names to remember, and items to bring. Then you simple record the page number on the appropriate date in the Calendex spread.
I really wanted it to work for me. But it wasn’t enough for me to know that there was an appointment that day; I needed to know what it was at a glance. So, with a heavy heart, I abandoned my Calendex. Don’t let that keep you from trying it, though, because this is the method of choice for loads of bullet journalists.
Great for people who: Like seeing the whole year at a glance / need detailed notes to prepare for an event / learn processes quickly / don’t mind flipping around in their dailies to find appointments.
VERDICT: Which method is the easiest?
The easiest future planning method is one that naturally fits into your lifestyle & planning habits. Don’t jump into a planning method just because someone else plans that way. Give it some real thought. You’ll be much more likely to use your bullet journal if it fits easily into your life.
Go grab some goals!
Which future planning method do you use? What challenges or solutions do you wish you’d known about earlier? Comment below.
Brainstorm with me!
Subscribe to my newsletter for Page Flutter updates, posts, and announcements.
Don’t worry, I only deliver the good stuff. No spam.
Facebook // Twitter// Instagram // Pinterest



Pingback: Bullet Journal Brainstorm GIVEAWAY |
I love your version of the Future Planner and it couldn’t be simpler. Unless I missed it, you didn’t mention anything about the small monthly calendars that you created above the “list” of vertical days. In your Instagram “talk”, I see that you put a “square” around a date in the small monthly calendar to flag that there is something that needs to be done on that day that is listed in the vertical listing. What a clever idea. That way one can look in two places on the same page so as not to miss any task, event…etc.
Hi, MQ! Yes, the mini calendars are a new addition, but I like how they give me options to visualize the month. It was a tight squeeze to get them in there, and I had to give up my header, but I’m happy with how they worked out. 😉
I love that as a future planning method… I’ll definitely be giving it a go. Thank you!
Great, Cassie! I’d love to hear how it works for you once you’ve had some time with it. 😉
Hi! I had the same problem with the calendex as you did. But aside from needing to see what my appointments were, it was almost perfect. So I modified a bit. I enlarged the size of the monthly space of the calendex, making 3 months per-page. I created simple signifiers for “doctor’s appointments ” “movies” “tests” “shopping” etc. So to log it, I draw the signifier, a name or nickname if necessary, and the time of the event, if it is time-sensitive. That saves space, and I can see what the event is. If I need any extra specific detalis (sometime I like to add notes: “take jacket to movies”) I check my monthly log.
This is great, Lucy! I love that you made it your own. I actually went back and started adding some Calendex elements to my future planning spread. That’s the trick; keep the parts you like, and fix the rest. Thanks for your kind comment! Hope to see you back soon. 🙂
I’m completely using your future planning method. I LOVE that there is room to write upcoming appointments and events on the actual date. I’m starting my second BuJo in March, and I’ve already added this new future log method. Thank you for this idea!
Thanks, Ally! I’m so happy it has helped you. I recently discovered that this is the same layout as the future planning pages in the Hobonichi planners. We must be doing something right. 😉
For me its Ryder’s 6 Pack, but with color and stickers! ? One reason traditional planners never worked for me is the calendar spreads consumed so much space and were way more than I need. I do have a small grid calendar (freebie from a vendor at work) in the back of my journal for reference as to actual dates. I also leave a bottom margin in my habit tracker where I code days that have a non-standard event with a colorful bullet. I can check my Ryder Rpread to see what the event is. Details of appointments are the one thing I use my mobile device and Google calendar for – the only thing really. I need to be able to pull up maps, details etc in the car and get reminder dings, and I never ever take my home bullet journal out of the house or my work one out if the office. Too afraid I will lose them!
Great post M.J. Thanks!
Sometimes simple is the very best answer. Glad you found a layout that works for you. 🙂
I’m liking the Alastair method, because the same space is shared by multiple months, yet still gives a full line (minus month columns) to each event/appointment.
One variation I’ve seen is to put the date in the month column, instead of a bullet.
That’s true; having a full line is a nice feature of the Alastair method. I like the idea of putting the date in the column! Thanks for the tip. 🙂
Hi! I’m really liking the column method, and will totally use it in my next bujo, but I have question. How do you deal with two or more events falling on the same day? There isn’t much room for that, is there?
I can usually fit 2 events, but if it goes over that I borrow from the Calendex method. Then I can write the event details in a page of my journal and put the page number in the Future Planning column. I hope that helps!